
Showing posts with label napkins technique. Show all posts
Showing posts with label napkins technique. Show all posts
Sunday, September 6, 2009


Friday, April 3, 2009
Decoupage napkins
If you believe a picture is worth a thousand words, how much more do you suppose a video is worth? If a picture is worth a thousand words, these videos are worth several thousand words, if they make their point while saving your time!
A few persons asked me how I do procede to decoupage. Well instead of writing to each of them I decided to videotape the entire process. I used one of my favorite paper napkin for kids and a small storage from Ikea. If you have any questions, I'll be glad to answer. I know that my blog is read by a few of you. So, please leave me your comments. I feel sometime that I'm talking to walls. let me know if it's well explained or if I've missed something. Don't forget to subscribe to my blog to stay tuned!
Part 2
Saturday, February 14, 2009
How to: decoupage napkins or serviette technique video
My apologies for not posting for so long... I must confess that it's not so easy to cumulate several positions in my company. Inevitably some stuff are not executed, like this blog...
Anyway, I received quite a few questions regarding the serviette or napkins technique. So first of all, thank you for reading this blog and thanks for your questions.
The most common question I had was "when I'd post a video for the serviette technique". So here it is, a new video that shows you how to apply the napkin on a base. In this first video I show you the basic application on a canvas. With the serviette technique you can easily create your own artwork.
This piece of work belongs to a collection which will be displayed at New Westminster's library during the whole month of March, on the top floor. I will showcase many pieces done with the napkins technique. I'll try to post some pics next month.
Next time I'll shoot a video which will show you another way to apply the napkin. This technique is more convenient for large bases. So stay tuned!
Part 2
Thursday, October 9, 2008
I did it!
Time flies so fast, I can hardly believe that I haven't written anything for a month. I must confess that I am not a big fan of writing! That's the reason why I take too long to write the articles. So maybe I just have to find something I'm more comfortable with. Also, let's pretend you're not here for the writing, but more for the pictures or steps-by-steps projects.
The life of an entrepreneur is not rosy everyday, however one of the great advantages is that you do what you want to do. There are no orders from a boss, you are THE boss. And that is definetely the icing on the cake! And I love it! So I'll try to post more pics than writings because there's no boss who asked me to, right?
The life of an entrepreneur is not rosy everyday, however one of the great advantages is that you do what you want to do. There are no orders from a boss, you are THE boss. And that is definetely the icing on the cake! And I love it! So I'll try to post more pics than writings because there's no boss who asked me to, right?
One of my passion, is to give a new life to second hand furniture. The second one is to create nice and colorful room-dividers. Being my own boss, allows me to do what I like to do. I love the papers. I will transform any discarded piece of furniture with beautiful patterned papers.
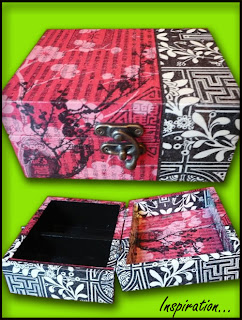
Besides papers I enjoy working with the paper napkins. In fact they are so easy to use. One of the main advantage is that you don't have to know how to draw. It's as simple as 1, 2, 3. Take a look at this box below. A simple wooden box becomes one of the most beautiful gift you can give to a dear one. The holiday season is at our door. So start now to create that gift that will make you say: I did it!
Read More......
Thursday, September 11, 2008
The napkin: from linen cloth to cellulose form
Well! I have a few of you that have been asking me if I have some books on the napkins technique. I would love to offer some books on the napkins technique, but I am not able to find great ones in English. There are galore of books in French, but so few in English. I intend to add a French version of the site for my French-speaking customers. So I will offer the books in French. In the meantime, while trying to locate great books in English, I'll post more steps by steps projects or pictures with this technique.
Nowadays we have a great deal of choice with the paper napkins. They are great embellishments for our interiors. They allow us to be different by customizing our furniture, even our gifts. But how was it before the paper napkins. Who is the ancestor? Where did all start? Well my friends, here's a little historical recap. I hope you'll enjoy it as much as I did.
Napkins sizes and uses have changed over the years. The museums are great places with their paintings to illustrate that. From the large linen cloth to the small squared absorbent paper, the napkin has changed during the courses of centuries, but its function is still the same: cleanliness and protection of clothing.
In the XVth century, the collective napkin appears in a painting by the Flemish painter Dirk Bouts: 
The Last Supper, Dirk Bouts (1415-1475), collegiate Saint Pierre de Louvain
We can see the napkin was a collective one for two, three guests. The napkin at this time was a very long linen cloth which ran along the table. There were no forks, they ate with their hands. The napkin wasn't superfluous!
During the Renaissance, the knives and forks appeared. They don't wipe anymore on the back of the hand or on the sleeve. The napkin became individual. The good manners code pointed out that ones needed to wipe his mouth and fingers before drinking. In other words, there was no more possibilities to transform ones glass into a trough with pigs!
We can see this first white napkin around the neck of a guest in the painting of Veronese "Wedding of Cana".
This is one of the biggest painting in the Louvre museum in Paris. Time to buy your ticket ;-)
In XVIIth century, the napkin spreaded on tables, at least in the bourgeois houses, and becomes a smart element of decor in the Dutch pictures for instance:
Willem Kalf, Desert, Ermitage Saint Pétersbourg
Jan Vermeer, Lady and gentlemen, museum of Brunswick
From now on, the napkin is seen in during the feasts...

Jacob Jordaens, ” The king drinks ” Mba of Brussels

Jan Steen, "The Twelfth-night", museum of Kassel
During the XVIIIth century, the napkin keeps its big dimensions, at least a metre aside, is in linen embroidered, monogrammed, damasked cotton. It hangs onto the buttonhole of the men' jacket:

Nicolas Lancret, " The lunch of ham ", Condé de Chantilly museum.
Jean-François de Troy often represented meals, where the napkin is staged in a nice way:

J.F. of Troy, "The lunch of oysters" Condé of Chantilly museum.
During the XIXth century, the napkin ring appeared and became its daily accomplice. This ring means that the napkin diminishes in size!

Claude Monet, Stadel museum Franckfort
In this beautiful painting of Monet we can see the ring napkin which still exist under this form.

Claude Monet, Stadel museum Franckfort
In this beautiful painting of Monet we can see the ring napkin which still exist under this form.
The napkin then took colours in the second half of the XXth century. It was decorated with every sort of motives, and became smaller and smaller …
...to adopt this cellulose form which can be thrown away.
And now, the paper napkins are kept, collected and used to decorate and transform ordinary objects into extraordinary one-of-a-kind gifts!
Read More......
Tuesday, August 12, 2008
Napkin technique - 1st technique
Don't you know yet the napkins technique? or do you already know it?

I'll try in this post to give you new ideas for your home decoration! Explore the richness of this technique which offers more and more possibilities thanks to an infinite variety of napkins papers. As you've surely noticed my store is specialized with papers with an ethnic flair. It doesn't mean that you cannot use another design. If you love flowers, bears or horses, that would do too!
So what do you need for this technique?
Napkins

Napkins with different patterns- ethnic patterns or not, the choice is yours.
Other materials needed

- varnish-glue
- adhesive tape
- scissors
- large adhesive tape
- brushes
- PVA glue
The supports

This technique can virtually be applied on any kind of surface: cardboard, iron, plastic, glass, polystyrene, wicker, metal, fabric, etc. However the wooden or terra-cotta base give better results. Try to choose light color base or prime in a shade that matches the color of the napkins. The colors of the napkins won't be too different in this case.
There ared different ways of working with the napkins technique. Today we'll see the cut technique.
How to:
1/ Using a pair of scissors cut out the napkin motif along the contours and remove the white layers. Most napkins are either 2-ply or 3-ply.

2/remove the white layers

3/Decide on napkin placement for the project. If you're working on a primed base be sure that the coat is totally dry first! Apply the varnish-glue using a soft brush.

4/ Wet the brush slightly with glue and spread evenly on the surface of the napkin until it is completely covered. Work slowly and be careful not to tear the napkin. Work from the center out towards the edge of the pattern.

5/ Allow to dry

6/ Done!

Always clean brushes with water immediately after use. Depending on quality of the napkins, smudges may appear around the motif. In this case, clean brushes with water frequently. Try a test area first. Do not varnish over the freshly applied motif while it is still wet, as it can easily tear.
Stay tuned for the second technique!
Tips: Sometimes it is difficult to remove the last layer. So use some adhesive tape!

Monday, June 23, 2008
Decopatch - new booth
Hi Guys! As some of you might know, yesterday I participated to the Sapperton Day Street festival. What a blast!
The weather was absolutely wonderful, the crowd enthusiastic! It was a really really good day for me. I met a lot of people who did give me some nice feedbacks.
Some of them knew about Decoupage, but for others it was a real discovery. They were amazed with what can be done with Decopatch papers.
For this event I displayed quite different materials on which can be applied Decopatch: cardboards, metal, terracotta, wood, plastic. People were so enthused! The star of the show was the pink snaked & polka dot old phone. I will post in a few days the step by step project.

Tuesday, April 29, 2008
Napkin technique & effects
Crackle medium in 3 steps
- Base coat: Apply the base coat of the paint you've chosen to the object. This is the color that will show through the cracks later.
- Craquelle: Apply the craquelle medium onto the dry paint in one direction only and let it dry
- Paint: Now apply the second coat of the other color paint you've chosen. Not too thick and in direction only. Apply the paint completely over the other coat. The thinner the coat is, the finer the cracks. For the result of rougher cracks the color must be applied thicker.
After several hours of drying you can go on with the work of napkin technique.

 Read More......
Monday, April 21, 2008
Napkins technique - the motif is all important

It's hard to imagine hobby-time without the popular napkin technique and its diversity of possibilities.
How to:
Apply a coat of white paint or gesso to the flower pot
- Remove the upper layer of the napkin and generously rip out the giraffe motif along with bits of the background so that the edge is rough.
- Apply to the pot with napkin varnish.
- Now paint the rest of the flower pot with the background colours of the napkin - ochre, brick red, yellow-brown and dark green applying the paint thickly and dabbing with the paint brush.
- Finally, coat the whole pot with varnish when dry.
It's quick, it's easy, so happy crafting!
Do not varnish over the freshly applied motif while it is still wet, as it can easily tear.
Tuesday, April 1, 2008
Africa...Africa
 From time to time, you will find here some ideas with Paper2Play products. The most difficult is to the first move, but once you've tried, you'll find it difficult to stop yourself!
Material:
Stretchers,
Paintings cardboards,
Acrylics colors,
Napkins,
Napkins glue,
Brush double-sided foam tape or adhesive tape.
Steps:
First prime your stretchers with white gesso or white acrylics. Then paint wiht a red acrylic paint.
Glue the napkins you've chosen on the painting cardboards.
Then tape those carboards using the double-sided adhesive tape.
In this example we've chosen:
Read More......
Subscribe to:
Posts (Atom)


