Thursday, September 11, 2008

The napkin: from linen cloth to cellulose form

Well! I have a few of you that have been asking me if I have some books on the napkins technique. I would love to offer some books on the napkins technique, but I am not able to find great ones in English. There are galore of books in French, but so few in English. I intend to add a French version of the site for my French-speaking customers. So I will offer the books in French. In the meantime, while trying to locate great books in English, I'll post more steps by steps projects or pictures with this technique.

Nowadays we have a great deal of choice with the paper napkins. They are great embellishments for our interiors. They allow us to be different by customizing our furniture, even our gifts. But how was it before the paper napkins. Who is the ancestor? Where did all start? Well my friends, here's a little historical recap. I hope you'll enjoy it as much as I did.

Napkins sizes and uses have changed over the years. The museums are great places with their paintings to illustrate that. From the large linen cloth to the small squared absorbent paper, the napkin has changed during the courses of centuries, but its function is still the same: cleanliness and protection of clothing.

In the XVth century, the collective napkin appears in a painting by the Flemish painter Dirk Bouts:
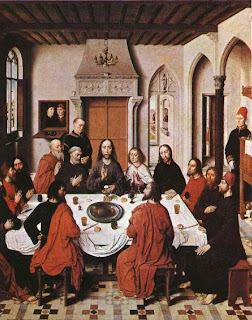

The Last Supper, Dirk Bouts (1415-1475), collegiate Saint Pierre de Louvain

We can see the napkin was a collective one for two, three guests. The napkin at this time was a very long linen cloth which ran along the table. There were no forks, they ate with their hands. The napkin wasn't superfluous!

During the Renaissance, the knives and forks appeared. They don't wipe anymore on the back of the hand or on the sleeve. The napkin became individual. The good manners code pointed out that ones needed to wipe his mouth and fingers before drinking. In other words, there was no more possibilities to transform ones glass into a trough with pigs!


We can see this first white napkin around the neck of a guest in the painting of Veronese "Wedding of Cana".


This is one of the biggest painting in the Louvre museum in Paris. Time to buy your ticket ;-)

In XVIIth century, the napkin spreaded on tables, at least in the bourgeois houses, and becomes a smart element of decor in the Dutch pictures for instance:

Willem Kalf, Desert, Ermitage Saint Pétersbourg


Jan Vermeer, Lady and gentlemen, museum of Brunswick
From now on, the napkin is seen in during the feasts...


Jacob Jordaens, ” The king drinks ” Mba of Brussels

Jan Steen, "The Twelfth-night", museum of Kassel

During the XVIIIth century, the napkin keeps its big dimensions, at least a metre aside, is in linen embroidered, monogrammed, damasked cotton. It hangs onto the buttonhole of the men' jacket:


Nicolas Lancret, " The lunch of ham ", Condé de Chantilly museum.

Jean-François de Troy often represented meals, where the napkin is staged in a nice way:

J.F. of Troy, "The lunch of oysters" Condé of Chantilly museum.

During the XIXth century, the napkin ring appeared and became its daily accomplice. This ring means that the napkin diminishes in size!


Claude Monet, Stadel museum Franckfort

In this beautiful painting of Monet we can see the ring napkin which still exist under this form.

The napkin then took colours in the second half of the XXth century. It was decorated with every sort of motives, and became smaller and smaller …

...to adopt this cellulose form which can be thrown away.

And now, the paper napkins are kept, collected and used to decorate and transform ordinary objects into extraordinary one-of-a-kind gifts!

Read More......

Sunday, August 31, 2008

A small decopatch project!


A new Decopatch project. Why not to customize our small pieces of furniture? Especially those from the big Swedish home ;-)! This is a very simple project which asks only for the choice of your papers. I chose Decopatch #302, #301, and #388. To finish I accentuated the designs with some gold paint outliner. I hope this gives you some ideas to start your own project.

Read More......

Thursday, August 14, 2008

Paint Outliner - Decopatch


Paint Relief or Decopatch Paint Outliner:

When I create an artwork I like to enhance some of the designs by using the paint outliner. I don't use only Decopatch paint outliner but others too. You can find different brands in creative stores. Fortunately, all seem to have the same characteristic: they produce a very surprising 3D effect.

And I can affirm you that once you try you'll be hooked forever!
This cerne relief usually comes in a 25g or 30 ml with an applicator tube. It's waterproof and acid-free. The colors are shiny, bright and innovative. And it is perfect for all types of applications with its thick texture: stencil, sponge painting, paintbrush. This outliner is used with different techniques: collage and inlays, decorative stencil, scrapbooking, small casts, lines and dots in relief, etc. The relief paint is used for creating cloisonné effects or lines to imitate enameling and stained glass effects. It can be applied on all surfaces: textiles, paper, cardboard, wood, glass, metal, leather, plastic, terra cotta! No ironing or cooking!

With the precision of the applicator tube you can easily create spectacular effects, and with its ease of use it's particularly suited to children too. You just need to apply a steady pressure and squeeze directly from the tube.

How to use it:

To create lines and dots in relief: hold the tube as a pen to get right out of the bottle, volutes, points, drops, lines in relief with a perfect precision!

Collages and inlays: the thick consistency of the paint allows you to include inlays (sequins, etc.). Or mirrors, glass cabochons or any other inclusion.

Read More......

Tuesday, August 12, 2008

Napkin technique - 1st technique

Don't you know yet the napkins technique? or do you already know it?


I'll try in this post to give you new ideas for your home decoration! Explore the richness of this technique which offers more and more possibilities thanks to an infinite variety of napkins papers. As you've surely noticed my store is specialized with papers with an ethnic flair. It doesn't mean that you cannot use another design. If you love flowers, bears or horses, that would do too!
In order to fully appreciate this napkin technique, I will show you step by step how to do it.
So what do you need for this technique?


Napkins


Napkins with different patterns- ethnic patterns or not, the choice is yours.

Other materials needed


  • varnish-glue
  • adhesive tape
  • scissors
  • large adhesive tape
  • brushes
  • PVA glue
The supports


This technique can virtually be applied on any kind of surface: cardboard, iron, plastic, glass, polystyrene, wicker, metal, fabric, etc. However the wooden or terra-cotta base give better results. Try to choose light color base or prime in a shade that matches the color of the napkins. The colors of the napkins won't be too different in this case.

There ared different ways of working with the napkins technique. Today we'll see the cut technique.

How to:

1/ Using a pair of scissors cut out the napkin motif along the contours and remove the white layers. Most napkins are either 2-ply or 3-ply.


2/remove the white layers


3/Decide on napkin placement for the project. If you're working on a primed base be sure that the coat is totally dry first! Apply the varnish-glue using a soft brush.


4/ Wet the brush slightly with glue and spread evenly on the surface of the napkin until it is completely covered. Work slowly and be careful not to tear the napkin. Work from the center out towards the edge of the pattern.


5/ Allow to dry


6/ Done!


Always clean brushes with water immediately after use. Depending on quality of the napkins, smudges may appear around the motif. In this case, clean brushes with water frequently. Try a test area first. Do not varnish over the freshly applied motif while it is still wet, as it can easily tear.

Stay tuned for the second technique!

Tips: Sometimes it is difficult to remove the last layer. So use some adhesive tape!

Read More......

Monday, July 21, 2008

Decopatch frenzie!

Are you into a Decopatch frenzy? I am!!!

Summer time is the best time to look around your house, and see what you don't want anymore. It's the time where someone's trash is someone's treasure. So rather than discarding what you may no longer use or want, try Decopatch. Give a second life to your trashes. For this reason I've come up with a 30% off on 3 products (for a limited time only) that will help you start: Decopatch glue 150g, Patchliner Lime/Green, and Decopatch Tresor to embellish your creations. I hope you will enjoy this opportunity!
A few of you asked me why should they used Decopatch glue instead of Mode Podge? I can go on and on, and tell you that Decopatch glue is the best...that Mode Podge isn't good, blablabla...but that won't be the truth.

The truth is that just like you when I started with Decopatch, I too thought that any kind of PVA glue would do.

After several attempts at working with PVA glue and Decopatch glue, I have to admit that Decopatch glue works best with the Decopatch papers. The Decopatch glue is an exceptional glue, which has been carefully studied and formulated for use with Decopatch papers. It's also a two in one product: glue and varnish. Most importantly the varnish-glue will absolutely not alter the colours, and not sear! The main and most valuable quality I've found is that this glue unlike the other glues will enhance the colours of the papers. The colours become more vibrant. And, once dry, it makes a non-sticky, clear water-resistant satin finish. So you can try different glues and see the difference by yourself, and I have no doubt that you will agree with me!

Read More......

Wednesday, July 16, 2008

Home Deco Step-By-Step: African Lady

Well finally my first "How-to"video is ready! In this tutorial I show you how to create by yourself your own canvas using the "Home deco" technique. Many of you have been waiting for it. So, I'll try in the future to post other step by step video projects. So give it a try if you haven't, have lots of fun with creative designing!


Read More......

Another sensational festival


Last sunday I participated again in an outdoor event: the Maple Ridge Carribean Festival. What a great festival! I really enjoyed being there as a vendor. It was an extremely sunny day that brought a lot of people.


My booth as usual attracted a lot of passerbys. I met nice vendors, especially my neighbour who bought a lot of Decopatch papers. She and her bought a lot of products. By any chance if you read this post, thank you again dear neighbour! And you know what? I forgot to ask you your name. What a shame!


Once again, I displayed my promotional products for Decopatch. I had a good result in term of sales. My expectations were not too high, but I did sell more than expected.


My booth was very colorful. This time I hung some dashikis - african designed shirts- that sold very quickly! Some customers were impressed by the quality of the fabric.


A big "Thank you" to my friend & her son. He did a great job and sold all the dashikis!


It's a festival I'll attend for sure next year. Now back to work! Soon, I will post some projects done recently. Stay tuned!

Read More......

Wednesday, July 9, 2008

25% off Storewide Sales


For a limited time only, from Jul 9-15 you can take advantage of 25% off your entire purchase.
Don't forget to browse the new Decopatch papers in our new arrivals section too.

A few of you have emailed me asking how to make a choice with all those papers. It's not really obvious I must confess. When choosing some papers for my projects I usually use the color wheel. It's really helpful. So next time you order, have your wheel ready.

If you need some designs ready here's my suggestions. For a wild look use Decopatch #209 + Decopatch #207 + Decopatch #334. I'll post in the coming days the project I've done with it.

Another one is Decopatch #284 + Decopatch #369 + Decopatch #382. You could also go with Decopatch #325 + Decopatch #310 + Decopatch #297. If you want to bring out the colours of the paper, begin all your project by priming the base. Most of the time I use a white basecoat.

I don't know about you but here in Vancouver we're having a pretty nice weather. I really enjoy this kind of days. I don't feel inspired when we have those rainy days. I feel like @#&$!!!. And it's quite often. I hated those days when I lived in Paris. But I got used to, here. Not much choice, eh?

So in the coming days if weather permitted, I'll be working like a slave. You'll get a chance to peek at some of my work. Hey by the way, I almost forgot to tell you that I have a new gallery. Yes! a gallery of inspiration. I know... I know... it took me longer than expected to put it together, but running alone a small business is no cakewalk. I hope this new addition to my website will give you a better idea of the beautiful artwork you can make using our unique products. After all my hardwork I would really appreciate if you can jot down a few words to let me know what you think.

Well that is for today. Until then, Happy crafting!

Oops! forgot to remind you guys to add my email address to your contacts: info at paper2play.com. Some of you complained that they haven't received the newsletter. I bet it's in your spam box!

Read More......

Saturday, July 5, 2008

Customize your vases!


Why settle for an ordinary vase when you can make your own unique, customized ones? Here's how.
To give your vases a new lease of life, all you need is some coloured paper, some glue and a bit of imagination!

Materials needed:
- A vase
- Sheets of Decopatch (your choice)
- A pair of scissors
- A brush

Steps:
- Tear or cut the pieces out of the Decopatch
- Glue the pieces on the vase, making sure that you overlap slighty
- Apply several coats of varnish to make it as waterproof as possible.

For a mosaic effect:
Tear the pieces in an irregular way. As you glue them over the vase, superimposing them, make sure that you interwaeve them in order to achieve the desired mosaic effect.

For a geometric effect:
Cut out squares, rectangles and triangles from different sheets and use contrasting coulours or patterns. Glue a first series of geometric shapes at the base of the vase. Starting from the base and working up to the neck of the vase, glue another set of shapes (wrapping all the way round the vase for a wave effect). Finish by gluing paper around the neck of the vase.

For a flowery look:
Create a coloured background on the vase before cutting out, using previously prepared drawings, flower shapes glue them on the vase using a contrasting effect.

Read More......

Wednesday, July 2, 2008

A garden ambiance on your balcony

This table decorated with decopatch paper will find a perfect place in your balcony. I found it in the " As is" section of Ikea. It was in excellent condition, except the top had some small dents.
I love Ikea furniture. I used to not to, but I've found that they have improve their quality and are still affordable.
So what did I need for this project?


Materials:

Large
brush #30. When I'm working on a large project I usually prefer to use the brush #30 because you I can work faster, and apply the glue on a larger scale. Don't forget that time is critical when applying the glue. With the hot season you better work fast. I did in the past used the large painter brushes, but I found that the brush wasn't hard enough to press down perfectly the paper. With the decopatch brush #30, you can press firmly with it, and still it won't shred the paper. And you need that to avoid wrinkles or bubbles!

Paperpatch glue. Try to wash frequently your brush for the glue dry quickly.
Decopatch paper
# 378 on top and number # 404 for the legs

In this project I applied the basic technique called: Torn paper.
In this technique you have 2 choices either the Patchwork or the Select Design.

Steps:

  • After selection of your paper, try to identify the design you want to bring forward. Tear carefully the paper around the selected designs. Leave some extra margin around. In this project I decided to tear the paper around the big flowers.
  • First, decide where you want to place this pattern. Glue the section where you're going to position the pattern and using the brush apply the design.
  • Continue to place all your patterns on your project
  • To fill the space in between patterns, tear up a piece slightly larger than the space to fill. Don't try to trace exactly the shape of the empty space
I didn't try to cover the bottom of the table. I just let the paper dry and then I trimmed off with a paper cutter. As usual I had fun. It's your turn now!

Read More......

Friday, June 27, 2008

Second life to an old phone...

During my last craft market this old Decopatch phone had a huge success, and I promised to some of the attendees that I'll post the step by step project. For this "Friday Project" I decided to decoupage with Decopatch #210 & #400

Read More......

Monday, June 23, 2008

Decopatch - new booth

Hi Guys! As some of you might know, yesterday I participated to the Sapperton Day Street festival. What a blast!


The weather was absolutely wonderful, the crowd enthusiastic! It was a really really good day for me. I met a lot of people who did give me some nice feedbacks.


Some of them knew about Decoupage, but for others it was a real discovery. They were amazed with what can be done with Decopatch papers.


For this event I displayed quite different materials on which can be applied Decopatch: cardboards, metal, terracotta, wood, plastic.
People were so enthused! The star of the show was the pink snaked & polka dot old phone. I will post in a few days the step by step project.


Read More......

Sunday, June 15, 2008

Decopatch display

Yesterday I did the Spring Bazaar. Attendance wasn't great. I had created a fancy display with some of my new boxes I have decopatched recently with some of my Decopatch papers. I had a few nice comments. Met a bunch of new, friendly faces...and answered tons of great questions regarding the Decopatch process. However I wouldn't do this market again because it was not appropriate for my products. But I had still a lot of fun with my friends that were with me. I'm glad to have their help!
A few pics at my display, bright, colorful and inviting! What do you think?


Read More......

Tuesday, June 3, 2008

Decopatched Lack table


Finally I finished the lack table. Actually it didn't take me too long. It is as easy as 1,2,3!

I am getting ready for the season.
I decided to participate in outdoors events to display my crafts supplies and and get more exposure. Even though it's a small business you still have to make yourself visible in order to attract new customers.
Hey it's festivals and craft-markets season! So yesterday was shopping day for a canopy...easier said than done but I finally found one! I would definitely make good use of it to protect my beautiful products from the capricious weather! It's Vancouver that's how we love it here! So expect to see me this summer, and don't hesitate to come and chat with me!

Read More......

Wednesday, May 21, 2008

Almost done!

I haven't been blogging too much lately. Finding the time is the big problem. Summer is almost at our doors, so I'm preparing myself with some items I would be able to display during the streets markets and festivals I will be attending.

Today I want to show you another item decoupaged with Decopatch. I really love to work with Decopatch. It is so easy! Well I mean when you plan ahead what you want to reach. Sometimes I am so eager to play with the papers that I get lost. Too many ideas at the same time, so the result is not satisfactory. So be sure of what you want, and have a rough idea of the final result!


I decided to decopatch a side table. I used the lack table from Ikea. I choose this table because it will be easy to take it apart if I need some displays during the craft markets.
I decided to use Decopatch
#369 - #284 - #400 - #422


I've found that it's easier to work with Decopatch papers once you've decided which design you want to get. At least, have a rough idea from to start with. You can always change during the process, but try not because you will find yourself in some trouble particularly when playing with geometric pattern!


Well it's almost done. Check in a few days to see the final result!

Read More......